Showing posts with label spring. Show all posts

Thursday, February 6, 2014

Valentines Pop art 4 ways


See all the art photos by clicking here

With the K-3rd graders I did some "pop art" that had a Valentines Day theme. It was also a good way to have them do different techniques and media in on project that also ends up looking pretty cool. I used the heart as a theme, but they could interpret it in any many of way or color and were encouraged to go beyond red and pink! I had them do the heart four ways ith 6x6" squares of paper:


  • Watercolor on white paper
  • Oil pastel on black paper
  • Penicl and pen on white paper
  • Collage on black paper


    Then I glued them into  a graphic 4 square layout.


    Its amazing how creative the kids could get and how it made them think outside the box (even though were creating in a box) Amazing how setting  few rules can free you to be creative. Also, teaching them how to cut and draw hearts is an amazing lesson in symmetry, and following directions, which at this age, is no small task!

    Wednesday, July 31, 2013

    Asian Plum Blossoms


    For the Springtime and as study of Asian painting, I had the younger kids do a study of the plum blossoms, with black paint branches, pink tissue paper and green "celadon" paper vases.

    Friday, March 15, 2013

    Kinder Bees


    Being that its springtime now, and the kids have been learning about insects, I had the idea to do bees with the little kids.

    This was a fun multi-step project that turned out great. I did explain a bit about the parts of a bee, and they used paper, paint, and some foam packing material for the wings.


     I'm always amazed at how much personality the kids can put into their art. It is always much more charming and evocative than the sample I show them!

    Wednesday, March 24, 2010

    Week 24 & 25: Eric Carle Butterflies


    It feels like its been a while since I posted, and that's because we did a 2-week project that was inspired by Eric Carle, the famous children's book author/illustrator of many beooks including the "The Very Hungry Caterpillar"


    Week 1 involved making the paper to collage the next week. Carle used colored tissue paper to paint, but I had the kids work with large sheets of white construction paper.  They were given just the primary colors and told to mix and play with it on the paper and not in their pallete.  They also had toothbrushes for stippling and spatterings and forks for scraping. No rules, except that if they wanted more than one color to collage they needed to be mindful of making areas of distinct color combos and not overmixing to mud.  They achieved some very rich layered looks!

    Week 2,  I gave each student their dried paper back and showed them samples of Carle's work again and then some simple digrams of how to make butterflies, bees and dragonflies from mostly just circles.
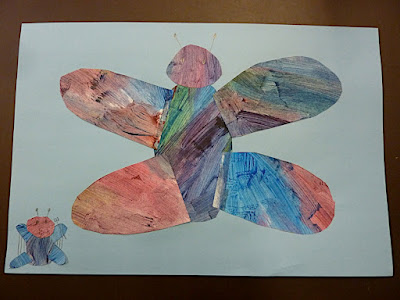


    Some kids made big bold insects and many made flowers, while some made tiny little insects that seems to be swallowed by the page.  Most had little trouble figuring out what to do.


    This turned out to be one of the best projects of the year. The color play with paint during the first step was very abstract and sensual, while they had to do some planning for their collage in step two. During the collage faze, they had to work with abstract shapes to make specific objects and also plan color, shape and size.  The end results are amazingly professional looking and really adhere to the spirit of Eric Carle. Good job kids!

    Week 23: St. Patrick's Day


    Since the the older kids had a field trip I just had the K-2 class. It was St. Patrick's week, which is one of my favorite holidays, and green is my favorite color too;-)


    An impromptu idea was to make shamrocks out of hearts, which the kids are pretty good at making.  The great thing is that the fold in the heart is perfect for maing it look 3-D. I had the kids make a bunch of different green hearts as well as some real simple squares of green and brown for a "leprechaun" hat that the shamrocks would be sprouting from. All this got pasted down, with the idea that the three hearts pasted together made a shamrock and only half the heart was glued so that the other part stuck off the paper to give it a lively look.

    The kids did a fine job on these and they were dead simple to get organized and make.

    Sunday, March 7, 2010

    Week 22: Arbor Day tree blossoms


    Wow, its already 2/3 of the way through the year!  My younger son had to make a 100th day collection of items, and our thoughts are already turning to Summer. But its still the blustery transition between Winter and Spring. One minute it's raining, the next its sunny. The trees are also noticing this change and beginning to burst into bloom.


    I was thinking of doing this project later in April during Apple Blossom time, since this area is know for its apple blossoms. But the area around the school is awash in the gloriously delicates pink blossoms of the plum trees.  The first week of March is also Arbor Day in California due the birthday of local plant scientist Luther Burbank on March 7.  So I was able to wrap three lessons in one!

    I had contemplated doing the classic blown ink tree trunk and branches, but we have so little time and limited cleanup ability, so I opted for a faster and cleaner black/brown marker trunk. I gave each child light blue paper and had them draw the trunk. For the younger kids, I advised that tracing their arm and hand make good trees.

    After that was done, they used crumpled pink tissue paper to make the blossoms. Some used other colors or  green paper for the ground. Many kids also remembered the technique where you wrap the tip of pencil with the tissue and then glue. That works well, but just crumpling the tiny pieces of tissue works just as well.

    These turned out real nice and are very Springy!

    Thursday, February 25, 2010

    Week 21: Year of the Tiger drawings


    As a nod to Chinese New Year and the Year of the Tiger 2010, I decided to do a directed drawing project. As for the actual Tiger subject and technique I was inspired by this artist blog and her really cute tiger:

    http://www.artprojectsforkids.org/2008/07/rousseau-tiger-drawing.html

    I have had luck with doing very targeted drawing exercises with the kids and this seemed like a good fit. Plus, I needed something simple to prepare since my home office where I plan and get projects figured out is in the final throws of being renovated and my files are being chased around the house.


    The materials are simple: paper, crayons and/or oil pastels and markers. I talked briefly about the 12-animal cycle of the Chinese New Year and showed them some real photos of tigers. Then I showed them on the board each step: 1. draw a circle 2. draw eyes 3. draw the nose 4. draw the cheeks etc.


    Most kids did a great job following directions and I encouraged them to fill the paper with color since many like to rush through things and get done. The best results came from careful drawing and making the lines dark enough so that after the color is applied the lines still show through.

    These Cool Cats will make a "purrfect" addition to our walls for our open house next month! I was born in the year of the Tiger, so this is especially close to my heart.