It's begining to feel a bit Autumnal, and eventhough many public schools started a week or two ago, our little school starts Thurs. Sept. 1. That means that I'm getting my art ideas ready! Luckily, I can look back on this blog and remember what projects worked best and do some recycling of the "Best of..." projects.
This year I will be teaching the 10 kindergarteners in Mrs. Dillon's room every week for 30+ minutes. Then as a change, I will be alternating the two older rooms (10 first-fourth graders, and 15 fifth/sixth) every other week. But instead of 30 minutes each week, I'll do an hour, so they will get roughly the same amount of time, but I'll be able to go into more detail and they will have more time.
As it was last year, I avoided really messy projects, knowing I had such a short time and also had to move my show into the next room right after the first class.
Sunday, August 28, 2011


Wednesday, May 25, 2011
Greek vases
The 5th/6th grade was studying Greece, so I themed several art classes for them. This one involved the beautiful clay pots and vases (amphora) that the Greeks decorated with red and black graphic shapes and figures.


Then I gave them orange paper and had them fold it in half so that when they cut it would be a complete vase shape.
Next I gave them a brief overview of the different athletes and gods that decorated these vessels. Of course most greek athletes are a a tiny bit underdressed, which let to the expected tittering amongst the crowd. Once the giggling settled down, I tried to get them to see that these ancient drawings were pretty basic. Almost all the different shpes were carrot-like. Legs, arms, fingers...all different elongated ovals.
Spring Butterflies
Always a crowd-pleaser, I did butterflies with the younger kids. This taught symetry, wax resist and watercolor.
I had the kids fold their paper in half and draw their butterfly on one half with oil pastel. Then they used a spoon to transfer the half-butterfly onto the other side. Some had to draw over their faint lines, but that is okay!
Then they used watercolor to fill in the blanks and the oil pastel showed through.

Celtic Crosses


To mark St. Patrick's Day, I wanted to get away from shamrocks and leprechauns (I love those, but can only do so many art projects involving those items!)
Also, since we are a Christian school, making a cross would be really cool. What made this standout was the technique: aluminum foil embossed and then aged with paint. I had envisioned using this technique for another project, but ended up using it here.
The technique involved me folding some sheets of foil into long multi-layered strips. Each kid was given one and they cut it into two. Then they had to used blunt pencil to incise/emboss lines and decoration into the soft foil. Then with a slightly damp brush they put green paint onto the foil and wiped off the excess.
The final result was either stone-like or similar to aged bronze! Really cool.

Gustav Klimt people
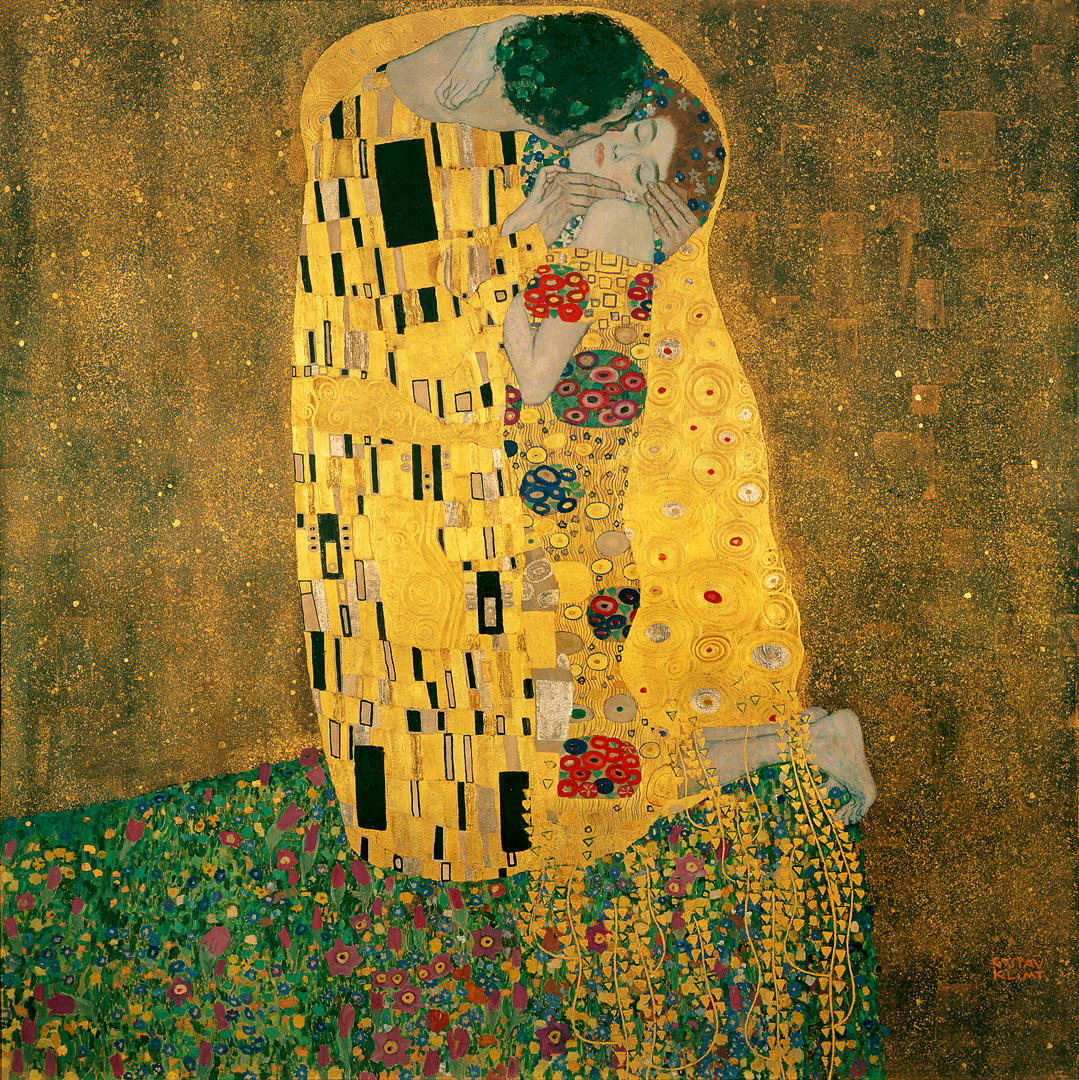
You may know his "The Kiss"
To translate this into soemthing that the kids could do in 30 minutes, I had them start with yellow paper, but this would be beautiful on gold paper or with gold paint.
I also had them choose a face or body from a fashion magazine as a starting point, since many of Klimt's paitings have a realistic looking head/torso and then he explodes witha riot of color and pattern. They glued this scrap on the paper.
Then they drew the body, or at least a suggestion of body/torso with flowing lines and lots of pattern. This was an interesting example of realism meets abstract art.


Wednesday, May 4, 2011
Making your own coat of arms


Inspired a bit by the 5th and 6th grade study of medieval history, I had the kids make their own coat of arms. Similar to project I did two years ago having the kids make their own flag, this requires them to think about their own identity and visualize it.
To inspire them I brought in a few completes coats of arms as well as some print out of the various elements thata re common and colors.
They first folded a piece of paper in half and drew half a shield and cut it out so the result would be symetrical.
Then they had to decide on their 1-3 favorite colors, shapes and insignia. I aked them if they had a favorite animal or toy or other item taht they could easily draw. Or they could draw an animal that represented their pesonality.
Many horses, lions and Star Wars figures resulted;-)
Tuesday, May 3, 2011
Chinese Scroll Painting

As a knod to Chinese New Year, I brought in some long scroll paintings that I had purchased in China in the 1990s. I was inspired by the beautiful flower plum trees, so also brought in a vase of plum branches.
I folded long white contruction paper in half so the kids had the tall canvas. Trying to emphasize the distorted perspective that is common in these paintings, I had the kids use their watercolors to make mountains and a river that stretched down from the top. If they wanted they could add some trees and houses or boats, but the main objective was the tall skinny landscape.
Then in the foreground they were to draw a tree with their black marker (the paper was still wet, so this mad ea nice wet-on-wet technique too.) For flowers they got pink tissue paper and made little balls to
glue onto the branches.
A finishing touch was a red square with their initials to mimic the "signature" stamp.


Sunday, May 1, 2011
Star Wars Collage
For those Star Wars fans in my art classes. This is for you!
Jeremy Messersmith - Tatooine from Eric Power on Vimeo.
Jeremy Messersmith - Tatooine from Eric Power on Vimeo.
Week 17: Valentines
The age-old question of what to do for Valentines Day? So many fun crafty things. This year I had the kids do "snowflake" Valentine compositions in paper. They choice a couple red, pink, white etc sheets and folded them like you would a snowflake and then cut out heart shapes. If they were lucky they would get some fun inticate shapes. If not, they would at least have 8 hearts on the table that they then could still use to make a collage. I tried to get them to layer larger pieces under and smaller on top.
4th Grade mission projects
This may be an off-topic, but related post. While this did not happen in my art class, I did want to highlight the very nicely done California Mission Models that the kids built in the 3rd/4th grade room! Not all the kids did Missions, since several did history videos, maps or ship models.
I'm a huge Mission model fan, going all the way back to my 4th grade Mission Santa Barbara. My son Devon (and I) built Mission Carmel.


Sunday, March 13, 2011
What Art teaches our kids
In my weekly round of other art teacher blogs, I came across this nice list of things that art teaches students. It is a distilation of a speach by Elliot Eisner, an Art Professor at Stanford. It was on Hands-On Art, a blog I frequent for inspiration. These same lessons can be learned via music, sports and drama etc, but Art is inherently an easy way to achieve these goals without regard to resources or talent.
10 Lessons the Arts Teach (by Elliot Eisner)
2. The arts teach children that problems can have MORE THAN ONE SOLUTION and that questions can have more than one answer.
3. The arts celebrate MULTIPLE PERSPECTIVES. One of tehir large lessons is that there are many ways to SEE AND INTERPRET the world.
4. The arts teach children that in complex forms of problem solving purposes are seldom fixed, but change with circumstance and opportunity. LEarning in the arts requires the ABILITY and WILLINGNESS to surrender to the unanticipated possibilities of the work as it unfolds.
5. The arts make VIVID the fact that neither words in their literal form nor numbers exhaust what we can KNOW. The limits of our language does not define the limits of our COGNITION.
6. The arts teach students that SMALL DIFFERENCES can have LARGE EFFECTS. The arts traffic the subtleties.
7. The arts teach students to think through and within a material. All art forms employ some means through which IMAGES become REAL.
8. The arts help CHILDREN LEARN to say what cannot be said. When children are invited to disclose what a work of art helps them FEEL, they must reach into their POETIC capacities to find the words that will do the job.
9. The arts enable us to have EXPERIENCE we can have from no other source and through such experience to DISCOVER the range and variety of what we are capable of FEELING.
10. The arts' position in the school curriculum symbolizes to the young what adults BELIEVE is IMPORTANT.
10 Lessons the Arts Teach (by Elliot Eisner)
1. The arts teach children GOOD JUDGEMENT about qualitative relationships. Unlike much of the curriculum in which correct answers and rules prevail, in the arts, it is judgment rather than rules that prevail.
2. The arts teach children that problems can have MORE THAN ONE SOLUTION and that questions can have more than one answer.
3. The arts celebrate MULTIPLE PERSPECTIVES. One of tehir large lessons is that there are many ways to SEE AND INTERPRET the world.
4. The arts teach children that in complex forms of problem solving purposes are seldom fixed, but change with circumstance and opportunity. LEarning in the arts requires the ABILITY and WILLINGNESS to surrender to the unanticipated possibilities of the work as it unfolds.
5. The arts make VIVID the fact that neither words in their literal form nor numbers exhaust what we can KNOW. The limits of our language does not define the limits of our COGNITION.
6. The arts teach students that SMALL DIFFERENCES can have LARGE EFFECTS. The arts traffic the subtleties.
7. The arts teach students to think through and within a material. All art forms employ some means through which IMAGES become REAL.
8. The arts help CHILDREN LEARN to say what cannot be said. When children are invited to disclose what a work of art helps them FEEL, they must reach into their POETIC capacities to find the words that will do the job.
9. The arts enable us to have EXPERIENCE we can have from no other source and through such experience to DISCOVER the range and variety of what we are capable of FEELING.
10. The arts' position in the school curriculum symbolizes to the young what adults BELIEVE is IMPORTANT.
Here he is on YouTube about art. click here to watch.
Thursday, February 24, 2011
Week 15-16: African Kente Cloth
As a project for the school's annual International Luncheon, they study a region...this year was Africa. Parents prepare African food and they spent a month or more studying it.
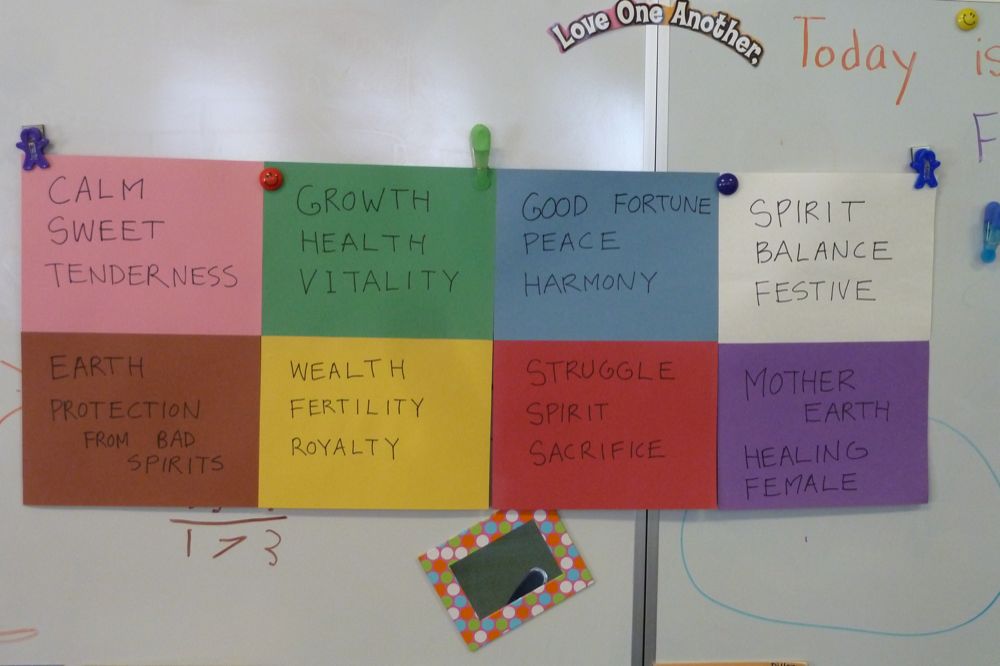
For art, we did "kente cloth" placemats. Kente cloth is a Central African specialty and uses strips of intricately woven cloth in bright colors. It is a ceremonial cloth and well known outside of Africa. Each color has a meaning.
To do this with paper, I used a large brown paper that they folded and then cut slits so it resembled a comb. Use a ruler for spacing. Your goal is to ufold the paper and have it look like a venetain blind but stay in one piece. Then you take 2-3 other colors and cut strip with a ruler. Decorate this strips with a geometric pattern.
Alternating colors, weave the colored strips into the brown paper. When this all done, you can also decorate the brown parts as well. The finishing touch was "laminating" this with contact paper.




Subscribe to:
Posts (Atom)