Wednesday, March 24, 2010

Week 24 & 25: Eric Carle Butterflies


It feels like its been a while since I posted, and that's because we did a 2-week project that was inspired by Eric Carle, the famous children's book author/illustrator of many beooks including the "The Very Hungry Caterpillar"


Week 1 involved making the paper to collage the next week. Carle used colored tissue paper to paint, but I had the kids work with large sheets of white construction paper.  They were given just the primary colors and told to mix and play with it on the paper and not in their pallete.  They also had toothbrushes for stippling and spatterings and forks for scraping. No rules, except that if they wanted more than one color to collage they needed to be mindful of making areas of distinct color combos and not overmixing to mud.  They achieved some very rich layered looks!

Week 2,  I gave each student their dried paper back and showed them samples of Carle's work again and then some simple digrams of how to make butterflies, bees and dragonflies from mostly just circles.
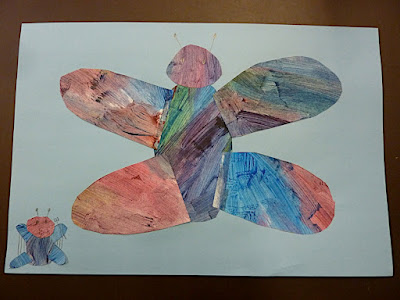


Some kids made big bold insects and many made flowers, while some made tiny little insects that seems to be swallowed by the page.  Most had little trouble figuring out what to do.


This turned out to be one of the best projects of the year. The color play with paint during the first step was very abstract and sensual, while they had to do some planning for their collage in step two. During the collage faze, they had to work with abstract shapes to make specific objects and also plan color, shape and size.  The end results are amazingly professional looking and really adhere to the spirit of Eric Carle. Good job kids!

Week 23: St. Patrick's Day


Since the the older kids had a field trip I just had the K-2 class. It was St. Patrick's week, which is one of my favorite holidays, and green is my favorite color too;-)


An impromptu idea was to make shamrocks out of hearts, which the kids are pretty good at making.  The great thing is that the fold in the heart is perfect for maing it look 3-D. I had the kids make a bunch of different green hearts as well as some real simple squares of green and brown for a "leprechaun" hat that the shamrocks would be sprouting from. All this got pasted down, with the idea that the three hearts pasted together made a shamrock and only half the heart was glued so that the other part stuck off the paper to give it a lively look.

The kids did a fine job on these and they were dead simple to get organized and make.

Sunday, March 7, 2010

Week 22: Arbor Day tree blossoms


Wow, its already 2/3 of the way through the year!  My younger son had to make a 100th day collection of items, and our thoughts are already turning to Summer. But its still the blustery transition between Winter and Spring. One minute it's raining, the next its sunny. The trees are also noticing this change and beginning to burst into bloom.


I was thinking of doing this project later in April during Apple Blossom time, since this area is know for its apple blossoms. But the area around the school is awash in the gloriously delicates pink blossoms of the plum trees.  The first week of March is also Arbor Day in California due the birthday of local plant scientist Luther Burbank on March 7.  So I was able to wrap three lessons in one!

I had contemplated doing the classic blown ink tree trunk and branches, but we have so little time and limited cleanup ability, so I opted for a faster and cleaner black/brown marker trunk. I gave each child light blue paper and had them draw the trunk. For the younger kids, I advised that tracing their arm and hand make good trees.

After that was done, they used crumpled pink tissue paper to make the blossoms. Some used other colors or  green paper for the ground. Many kids also remembered the technique where you wrap the tip of pencil with the tissue and then glue. That works well, but just crumpling the tiny pieces of tissue works just as well.

These turned out real nice and are very Springy!

Thursday, February 25, 2010

Week 21: Year of the Tiger drawings


As a nod to Chinese New Year and the Year of the Tiger 2010, I decided to do a directed drawing project. As for the actual Tiger subject and technique I was inspired by this artist blog and her really cute tiger:

http://www.artprojectsforkids.org/2008/07/rousseau-tiger-drawing.html

I have had luck with doing very targeted drawing exercises with the kids and this seemed like a good fit. Plus, I needed something simple to prepare since my home office where I plan and get projects figured out is in the final throws of being renovated and my files are being chased around the house.


The materials are simple: paper, crayons and/or oil pastels and markers. I talked briefly about the 12-animal cycle of the Chinese New Year and showed them some real photos of tigers. Then I showed them on the board each step: 1. draw a circle 2. draw eyes 3. draw the nose 4. draw the cheeks etc.


Most kids did a great job following directions and I encouraged them to fill the paper with color since many like to rush through things and get done. The best results came from careful drawing and making the lines dark enough so that after the color is applied the lines still show through.

These Cool Cats will make a "purrfect" addition to our walls for our open house next month! I was born in the year of the Tiger, so this is especially close to my heart.

Wednesday, February 17, 2010

Week 20: Mardi Gras Masks


This project turned into a real crowd pleaser!  The kids liked it and I think their results turned out great.


I try to do seasonal/historical things as much as possible and this ties into Mardi Gras season,  as well as being related to the kids' study of "Island Nations." In this case it was a Caribbean theme, whereas the tiki masks I did the week before were more Polynesian.  I ended up using these Mardi Gras masks as centerpieces for the International Lunch the kids had as a culmination of their Island Nation studies.  The ironic thing is that this theme was picked before the horrific Haitian earthquake and ended up being a great tie-in to some fundraising for Haiti.

This project also fits into my increasingly common use of paper plates as artistic materials. This is at least the third use of plates this year. Maybe I should write a book!;-)  I ended up using plates mainly as an economical alternative to the really costly masks you can buy in craft stores or really tim- consuming plaster method that I would do with older kids.

The prep involved getting small lunch plates and cutting them in half.  Then I used a 1" circle punch for eyes and nose.  A chopstick hot-glued on as a handle completed the work I did before class.

I find that the kids really like the assemblage projects that involve hot glue guns and "stuff."  Since I use the glue gun, this does make for a more intensive class since they lineup have me put the hot glue on their masks.

I printed out several examples of the real masks and gave them a quick background on the signigance of Mardi Gras, Lent and Easter. This being a Christian school probably allows for more leeway in this respect.  I also showed them that the official colors are purple, yellow and green.

For materials I gave the kids colored feathers, sequins, ribbon, pop-poms and markers.  It is amazing how colorful and festive they ended up looking with just a few simple embelishments.  The kids spent so much time making these, that we needed almost two classes to complete.

Wednesday, February 10, 2010

WEEK 19: Tiki masks


Many of the kids had been to Hawaii so were familiar with the look.  I had them fold their paper in half to help with the symmetry, and tried to get them to use bold distorted shapes for the facial features.

The school has an International Lunch every year and this year's theme is "Island Nations" like the South Pacific, Japan, Australia, the Carribean, etc.  They like to decorate the room, and this project is catered to that.  I printed out a bunch of Tiki images and Maori masks as examples for the kids.

To give them a bit of character, I had them use brown paper and a simplified color scheme of black marker and one or two crayons.  Some kids used more colors but they turned out well. As final touch I had them delicately crumple and then re-flatten their work, so it looked like bark or rustic wood.

Friday, January 22, 2010

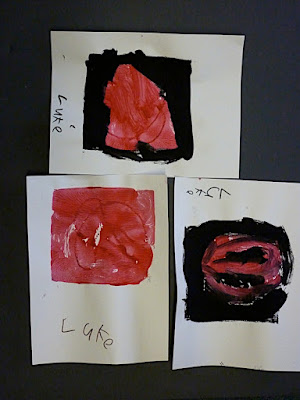
Week 18: Styrofoam pop art printing


I really like to introduce new concepts, and printmaking is one of those really cool, but sometimes hard concept with youngsters—eventhough, little kids are always "making prints" in their daily lives. As a background in simple graphic forms and printmaking, I decided to talk a bit about Pop Art, Andy Warhol and  Keith Haring.  I showed Haring's red heart series and Warhol's Marilyn Monroe painting. The Haring heart was a great example of simple, two colors and line work mixed with block color. The Warhol was good for the concept of multiple editions of one image.


The hard part is finding a suitable "plate" for having the kids "take away" material that will then print white. Wood, lino and other true printing supplies are expensive, and dangerous for the kids, so I figured I needed a material that was pliable that they could "carve" with apencil or brush handle, with no sharp items needed.  I thought of foam core, but quickly decided on a bunch of square foam takeaway food contaniners, that I cut down to 6 inch squares. The kids could then just use a pencil to make lines and dots in the thin foam.

As for ink, you can use offical printmaking ink and brayers and inking trays etc, but who has time or energy for that with 12 kinders and 30 minutes?  So I had to use what I had on hand: Crayola markers and poster paint.  Don't laugh, but the markers do a decent job, especially if you get a good color that will bead up on the foam and if you really press the print to soak up the marker. I used the markers as a "warmup" while I finished getting the paint ready. Marker is also less messy while they experiment.  But it tends to work better for smaller stamps and more graphic images.

Another lesson I learned was the fewer the colors the better. One color would be great, but with my background in newspaper design, I knew red and black are two great complimentary colors for printing. They also make nice Valentine-themed works.  Since I did this with the 3-4th grade first, they tended to make more complicated images and wanted to use multiple colors, which often made them feel frustrated by the limitations of styrofoam printing. Ironically the K-2nd graders did not question my limited colors and were less judgemental of their work. In the end, I think they ended up happier with the results.

The best images tended to be the simplest, with some texture and freedom.  I am really proud of the true fine art that these kids produced!!

KINDERGARTEN, FIRST,  SECOND GRADERS:


Wednesday, January 13, 2010

Week 17: Weather mobiles


With the K-2nd graders I did something related to weather. Coincidently, the weather this day was actually quite variable: one minute it was sunny, the next it was raining, foggy or cold, and then several rainbows popped up.  Nice inspiration for the youngsters!


I had struggled with how exactly to rig the mobiles, with thoughts turning to wire coat hangers at first. But I turned to the old friend of the kinder-crafter...the paper plate;-)  I initially thought of having the paper plate flat with the items hanging down from around the outside, but I was inspired by the rainbow to cut the plates in half and have the weather icons hang from the flat side.


This allowed me to have the rainbow take center stage and teach the kids the order of colors in a rainbow: Red at top, orange, yellow, green, blue (actually indigo) and then purple (officially violet). We discussed weather and the colors and that got the kids talking and thinking.


To speed things, I compiled a sheet of weather icons for the kids to color/decorate and then cut. I printed these on heavier card stock.  They then had the choice or ribbon, yarn or pipe cleaners to hang these different items. Most chose a really blingy silver sparkle ribbon or pipe cleaners.


For this age group, this kind of color/cut/assemble project is amazingly effective, even if it is not incredibly creative. It is good for concentration and coordination.