Wednesday, November 18, 2009

Week 11: Cutout Turkeys

Being the last week of art lessons before Thanksgiving, I decided to "trot" out some good old fashioned paper turkeys. This was also an easy project to shoehorn in after getting some kids to finish their Thanksgiving quilt squares from last week. I did similar, but different, turkeys for the K-2nd grade room and the 3-4th grade room. I think the younger-kid-version is a cuter idea (my part of the project-not the kid's part), but the work that all the kids did ended up adorable and full of personality.


For the younger kids I cut red paper plates in half to use as a base, and then had them trace/cut handprints for the back feathers. Then many used a foot tracing for the neck. Some circles for head and eyes, triangle for beak, and some accordian folded legs round out this "feast" of cuteness.


------------------------------------------------------------------------


For the older kids, I had them use a black background and lots of different geometric shapes for the feathers and head etc. In hindsight I would have had them do handprints as well. I am always amazed at how personal and unique each child makes their projects!

Wednesday, November 11, 2009

Week 10: Thanksgiving "Quilts"


ALL THE K-2ND GRADE SQUARES


I wanted to do something for Thanksgiving...partly becasue I feel guilty that I have not done many "seasonal" art or craft projects this year. I contemplated the usual pilgrims or indians made from oatmeal cans or paper and the turkey idea might pop up, but decided on a "what am I thankful for" quilt.  I won't be making it out of cloth since this is a pretty quick art class session every week, but at least I can piece together these paper squares into an even more interesting composition.

The actual process was not that hard: Have 9 inch squares of white paper and pens/colored pencils. The only rules I applied were that it had to be pretty colorful and also have the kids name visible.

Some kids did multiple images and some did single images. Some stuck to Thanksgiving imagery, while many used God and other Christian symbols (this IS a Christian school). Some also included their families. What cracked me up is that many also drew pictures of Star Wars characters, airplanes, trees and sports, which is adorably honest.

I will probably end up doing this with all the kids and I will post more pictures next week.

Wednesday, November 4, 2009

Week 9: Vanishing point perspective


With the 3rd and 4th graders, I did a lesson involving perspective and vanishing points. A few weeks ago I did a project with a simple still-life and using one color, and I noticed that most of the kids got frustrated with drawing a 3-d box. This lesson hopefully will give them a bit more insight into perspective.

The first step was to have them draw a flat horizon line on their paper and a dot vanishing point in the middle of that horizon line. Then they drew some simple 2-d shapes in the "foreground" like squares, circles, stars etc. With a ruler they then connected all the edges and corners with the vanishing point they drew earlier.

This resulted in a lot of "railroad track" or "laser beam" looking objects that go forever, so I showed them the trick of adding a back to their shape and erasing their vanishing lines.Many of the kids ran with this and made pictures that looked like train tracks or piers jutting into the ocean. I also showed them how to make their names in 3-d as well.

I was amazed with how much effort they put into these drawings and how quiet and concentrated they were.

Tuesday, October 27, 2009

Week 8: Pumpkin reflections


This week our little school of 50 kids had 18+ kids out with the flu (swine or other white meat, not sure?)  Our family of 5 had 4 of us down, but I was well enough to do art with the 3rd and 4th graders. My class of 21 had 12 in it.  I had intended to do something Halloween-y with black paper and colored pastels or pencils, but the idea lacked punch so I borrowed this great idea from the  Art Projects from Kids blog. Thanks!

Its a pretty simple but great idea. You take a half sheet of black paper and draw, then cutout, a half pumpkin. You then take the pieces you have made and flip/mirror them over. If you glue these onto a colored piece you get a great positive/negative lesson. To embellish it, I still had the kids use yellow or white or orange colored pencil to draw spider webs, cats, bats, moons etc.

For the most part, they really understood the concept, with just a bit of help. Some of the kids "altered" the idea and used more paper and made a black and white side to put on a colored sheet, and that looked cool as well. Great job and a real nice Halloween decoration. I even suggested to the kids that they might want to take this idea home and try it for a Christmas Tree or silly face.  I could see the lightbulbs in some of the kid's heads!  This started out to be a makeshift concept, but it turned out to be one of the best.

I often feel like the kids lift me up when I'm feeling a bit down or uninspired. Thanks kids!

Tuesday, October 20, 2009

Week 7: Hieroglyphics


This week, I only had the 3rd and 4th graders, since we had a field trip during the younger kids' art time. So I took the opportunity to do something more challenging that I might not attempt with younger kids.

I had the kids translate their name into Egyptian hieroglyphics and then make a golden cartouche. There are many websites out there that have good alphabet charts. Here is one really good one:

http://johnmactaggart.com

I spent a lot of time talking about how this alphabet is really a phonic alphabet and that each child's name is really made up of sounds, that might not be the same as the letters. For example, my name "Dennis" is drawn with only one N symbol. I gave each child a handout that showed each sound and the pictogram. Some letters, like many vowels, have several different pictures based on if it is a long or short vowel. Also, letters like J and G share similar pictures.

I was very impressed with the ability of the kids to figure out how to translate their names.

The second step was to draw, in pencil, the pictograms onto a paper cartouche handout I gave them. They then transfered this to a piece of gold foil paper and colored it with multi-colored sharpie pens. All that was left was to cut it out, paste it onto some blue paper and then maybe add some glitter glue.

Wednesday, October 14, 2009

Week 6: 3D shapes and value


For the third and fourth graders, I brought in a simple still life of a box, pumpkin and lava lamp (hey, it was the best tall vertical/conical shape I could find quickly). I wanted the kids to experiment with some elemental shapes.


It was a rainy day, so the kids had been inside all day, so were a tad bit squirrelly, but they did surprisingly well! I asked them to use one color of crayon or pencl so they could experiment with ligth and dark values and shadows.

The most intersting part was how how consistently hard it was for them to draw the cubic form correctly. I could have done a better job showing them the steps, but in the end most got it pretty good. Many used a practice sheet of paper and for some the process of trying the shapes was the best part of the lesson, even if they did not get a finished still life.

Owls

Inspired by several other art teacher bloggers, we did colored paper owls in the K-2nd classroom. The first thing the kids did was to draw the basic shapes on a large blue paper. Then they tore little "feathers" out of brown, gray and white paper. Eyes are circles and beak, ears and feet are triangles. They really got into this project.

.

Wednesday, September 30, 2009

Week 4: Fall Leaves


Since I haven't done anything seasonal yet, I decided to do something related to Autumn. (If you say "FALL" in Mrs. Dillon's room, all the kids fall to the floor;-) I had the kids cut out colored paper leaves that they perforated with pushpins to give them texture and to let light through when hung in a window. I hung them with rustic looking twine. I got this idea from Family Fun magazine.


I drew three different shaped leaves and photocopied them for each child. They then cut these out and used them as templates for the colored paper. Then with pushpins they made vein lines. Hung in a window they look nice.


Some of the kids even used the white templates and colored those with crayons. The older kids were very quiet and intent on their jobs during this project!

Tuesday, September 22, 2009

Week 3: Van Gogh sunflowers


A common theme among art projects is Van Gogh's series of paintings of sunflowers. Being the end of summer, and contining the "basics" theme for September,  I had the kids "paint" a still life of sunflowers.  Instead of paint (which honestly is hard to do with 19 kids and 30 minutes and little prep/cleanup space) I had them use oil pastel. It was also school picture day, so I wanted to do something that was a tad bit less messy for all these beautifully dressed kids. If I had honestly remembered the school pictures when I made the schedule weeks ago, I might have chosen a completely mess-free project. But the kids did good, and I hope the parents did not scream when they saw them!
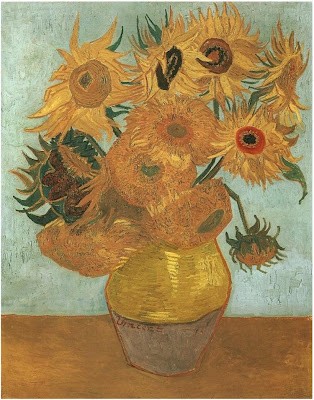

I tried to emphasize cool vs. warm colors, as well as getting the kids to use their eyes and draw what they saw, not what they think a vase of sunflowers look like. As in Van Gogh's painting, I had three different looking sunflowers in the vase. One had a dark center, one was all fluffy and the other was tight and all yellow.

The kids, for the most part, did a good job of actually looking at the flowers, and many did a great job of interpreting the vase and an imaginary background!

Here are some of the 3rd-4th graders work:


Here are some of the the Kindergarten-2nd graders. What was enlightening about this young group was the difference between a 5 year-old and a 7 year-old. The young ones really don't get the concept of a still life and drawing from life: they just draw pink flowers and some squiggly lines. The second graders really look and count the flowers and use the "right" colors.  All that progression in just 2 years!

Kindergarteners:


First graders:


Second graders: