I volunteered to teach art to K-6th grade at a small private school. Here's OUR story.
Thursday, December 17, 2009
Week 15: Christmas villages
Being the last of the three December art classes, I wanted to continue the Christmas feel, but throw in something a bit new. We did cards, snowmen, snowflakes and some watercolor, but for this project I combined the ever popular "stained glass" theme with some architecture. Voila...Christmas houses and villages.
I wanted to these to stand up in a window, so I had the kids fold a piece or two of brown paper into thirds or fourths-whichever worked best. Accordian fold is the best. This resulted in vertical sections of paper that they could draw some whimsical buildings. I had them cut out the roof and window shapes. Then they could glue some colored tissue paper behind the holes for colorful windows.
I love the "scool" and the petstore. This was a Kindergartener, with maybe some help from an older writer?
I did try to emphasize the various types of roof shapes and show them photos of Amsterdam row houses and San Francisco vistorians.
These can really turn out well. For a more gingerbread look, you could have them do all the detail drawing with white paint, but the black markers look fine too. I used construction paper which is a bit thin and light. If I could get any supplies, I might try a stiffer paper stock, but not too thick for cutting purposes.
Funny thing, was that the younger kids had no trouble at all with this relatively complex concept of drawing and then cutting. They had wilder imaginations and I think fewer inhabitions. But they did have trouble with teh concept of gluing the tissue paper on the back of the houses ;-)
Merry Christmas to all and to all an artistic night!!
Friday, December 11, 2009
Week 14: Christmas Snowmen/tree assemblage
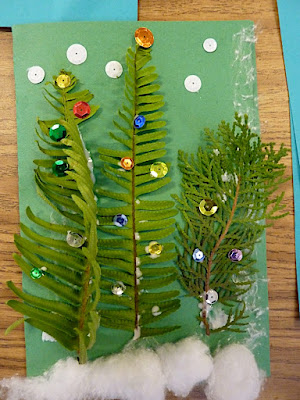
One of the kids' favorite projects last year was an assemblage of cotton ball snowmen. I decided to revive that idea and also add in the idea of making some Christmas trees as well.
For the Snowmen, we used cotton balls, twigs, sequins, ribbon, pipe cleaner and other odds and ends. There is no limit to what you can use. White glue or hot glue is needed though so really delicate items or heavy things might not work. I had thought to use buttons, but I could not find my buttons.
For the Christmas trees, I had used fern for the older kids, but probbaly should have dried or pressed the fern first since the fresh fern was either too springy or curled as it dries. For the younger kids I ended up cutting some very nice flat cedar branches. Eiher way, these cards will not last forever, but they are cute.
The younger kids seemed to be more free with the project then the oler kids who had higher expectations. But all the results are super cute!!
My samples
For the Snowmen, we used cotton balls, twigs, sequins, ribbon, pipe cleaner and other odds and ends. There is no limit to what you can use. White glue or hot glue is needed though so really delicate items or heavy things might not work. I had thought to use buttons, but I could not find my buttons.
For the Christmas trees, I had used fern for the older kids, but probbaly should have dried or pressed the fern first since the fresh fern was either too springy or curled as it dries. For the younger kids I ended up cutting some very nice flat cedar branches. Eiher way, these cards will not last forever, but they are cute.
The younger kids seemed to be more free with the project then the oler kids who had higher expectations. But all the results are super cute!!
Tuesday, December 1, 2009
Week 13: Watercolor with crayons and salt
It's begining to look a lot like Christmas around here. To help ring in the season, I had the kids do some snowflakes with watercolor, white crayon and salt. This was an exercise in techniques as well as a final product kind of project. But we will make soem snowflake ornaments with the dried watercolors next week.
Putting salt on wet watercolor is one of my favorite techniques. The salt soaks up the color and leaves little "blossoms" of white that look like snowflakes. It great for winter sky texture.
I had the kids do some experimenting with wet color washes. Some used white grayons to make some wax resist lines, stars, snowlfakes etc.
Then I had the kids make some small circles that they drew white crayon snowflakes inside. We will cut out these and make ornaments.
Here are what the final ornaments looked like:
Week 12: Painting and Printing reflections
I had the kids fold their paper in half and paint a scene of trees or hills, or other things in the top half. As they worked I had them fold the paper down while the paint was wet and rub to achieve a monoprint that makes it look like a reflection. The wetter the paint the stronger the reflection is.
Most kids really got into this and got some relly nice landscapes. Several kids did some very nice abstracts as well. I was very impressed with the concentration and completion exhibited in this project.
Wednesday, November 18, 2009
Week 11: Cutout Turkeys
Being the last week of art lessons before Thanksgiving, I decided to "trot" out some good old fashioned paper turkeys. This was also an easy project to shoehorn in after getting some kids to finish their Thanksgiving quilt squares from last week. I did similar, but different, turkeys for the K-2nd grade room and the 3-4th grade room. I think the younger-kid-version is a cuter idea (my part of the project-not the kid's part), but the work that all the kids did ended up adorable and full of personality.
For the younger kids I cut red paper plates in half to use as a base, and then had them trace/cut handprints for the back feathers. Then many used a foot tracing for the neck. Some circles for head and eyes, triangle for beak, and some accordian folded legs round out this "feast" of cuteness.
------------------------------------------------------------------------
For the older kids, I had them use a black background and lots of different geometric shapes for the feathers and head etc. In hindsight I would have had them do handprints as well. I am always amazed at how personal and unique each child makes their projects!
Wednesday, November 11, 2009
Week 10: Thanksgiving "Quilts"
ALL THE K-2ND GRADE SQUARES
I wanted to do something for Thanksgiving...partly becasue I feel guilty that I have not done many "seasonal" art or craft projects this year. I contemplated the usual pilgrims or indians made from oatmeal cans or paper and the turkey idea might pop up, but decided on a "what am I thankful for" quilt. I won't be making it out of cloth since this is a pretty quick art class session every week, but at least I can piece together these paper squares into an even more interesting composition.
The actual process was not that hard: Have 9 inch squares of white paper and pens/colored pencils. The only rules I applied were that it had to be pretty colorful and also have the kids name visible.
Some kids did multiple images and some did single images. Some stuck to Thanksgiving imagery, while many used God and other Christian symbols (this IS a Christian school). Some also included their families. What cracked me up is that many also drew pictures of Star Wars characters, airplanes, trees and sports, which is adorably honest.
I will probably end up doing this with all the kids and I will post more pictures next week.
Subscribe to:
Posts (Atom)